
They are knit on 2 needles, and I used 2,5 mm needles. the wool is actually for 3 or 3.5 mm needles, but I prefer a firm knit for little shoes.
here goes : (Dutch translation in green)
 |
| This is what you need |
Het hoofdkleur is wit. Het tweede kleur is rood. Splits het rood in 2 bolletjes. Je hebt ook een stekenhouder nodig.
CO 35 stiches with white yarn
r1 : knit,
r2 : k1, yo, k 16, yo,k1, yo, k16, yo, k1
r3 : knit - always twist the loops when you knit them, to avoid a hole
r4 : k2, yo, k16, yo, k3, yo, k16, yo, k2
r5 : knit
r6 : k3, yo, k16, yo, k5, yo, k16, yo, k3
r7 : knit
r8 : k4, yo, k16, yo, k7, yo, k16, yo, k4
r9 : knit. you have 51 stiches on the needle.
35 steken opzetten met wit
r1 : 1 nld rechts breien
r2 : 1r, omslag, 16r, omslag,1r, omslag,16r, omslag, 1r
r3 : rechts, om een gaatje te vermijden telkens de lus draaien voor je hem breit.
r4 :2r, omslag, 16r, omslag, 3r, omslag,16r, omslag, 2r
r5 : rechts
r6 : 3r, omslag, 16r, omslag, 5r, omslag,16r, omslag, 3r
r7 : rechts
r8 : 4r, omslag, 16r, omslag,7r, omslag,16r, omslag, 4r
r 9 : rechts. Je hebt 51 steken op de naald.
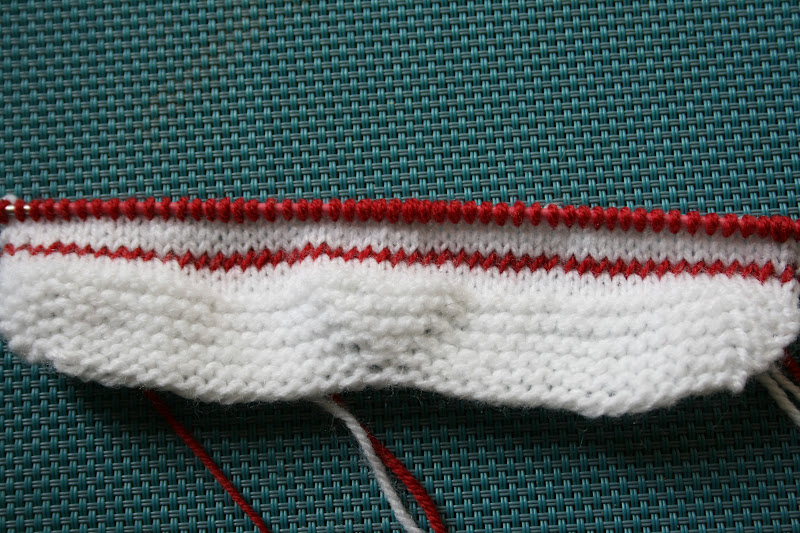
 |
| This is how it should look |
 |
| you have increases at each end and in the middle |

 |
| the middel increases are triangle shaped |
Brei verder in tricot steek. 2 nld wit, 1 nld rood, 3 nld wit, 1 nld rood. De laatste rij is een rechtse.

 |
| you have now knitted 7 rows in stockinette |
Nu brei je 19 steken averechts in rood, 13 steken averechts in wit, 19 steken averechts in rood. gebruik het 2e bolletje rood voor deze laatste 19 steken.
 |
| the middle stiches in white will form the white tip of the shoe |
1 : k19 in red, k 10 in white. there remain 3 white stitches. Slip 1, knit 1, pass over the slipped stitch. Only 1 white stitch remains on the needle. You don't knit it. Turn to start a purl row.
2 : Slip 1 stitch, purl 7 white stitches. There remain 3 white stitches. Purl 2 stitches together. There remains 1 white stitch on the needle. Do not knit it, turn again to start the next knitting row.
volg de instructies precies :
1 : 19 rechts in rood, 10 steken rechts in wit. Er blijven nog 3 witte steken op de naald. Breng 1 steek over zonder te breien, brei de volgende steek, haal de ongebreide lus over deze steek. Er blijft 1 witte steek over op de naald. Brei ze NIET, draai je werk om averechts te beginnen.
2 : haal 1 steek af zonder te breien, brei 7 averechts, er zijn 3 witte steken over op je naald. Brei 2 averechts samen. laat 1 witte steek ongebreid staan. Draai je werk om rechts te breien.
 |
| so far, so good ! |
3 : 1 steek afhalen, brei 7 rechts. Er zijn 2 witte over : haal 1 steek af, brei de volgende, haal de afgehaalde lus over. Er zijn geen witte steken over. Draai je werk.
 |
| at the turning point... |
4 : 1 steek afhalen, 7 averechts, 2 averechts samen breien. Draai.
 |
| Congrats ! You're doing fine ! Whipe off that sweat on your forehead. |
5 : haal 1 steek af. 7 rechts, haal de laatste witte steek af, brei 1 rode rechts, haal de witte lus over de rode steek. zorg ervoor dat je de witte en rode draad kruist aan de achterkant van je werk, zo voorkom je rare losse steken.
 |
| cross just before you knit. Pull tight. |
6 : 1 afhalen, 7 averechts in wit, kruis draden, brei de volgende 2 steken averechts samen met een rode draad. (1witte en 1 rode steek) Draai.
 |
| picture taken just before I knitted the 2 last stiches together. |
7 : Slip 1 red stitch, cross the threads, cont. in white, k7, cross the threads, cont. in red, slip next stitch, k1, pass over slipped stitch. Turn.
8 : slip 1 red stitch, purl the next white stitch in red, cross threads and cont. in white. p5, cross threads, cont. in red. p1 white stitch in red, purl the next 2 red stitches together, turn.
7 : 1 rode steek afhalen, kruis draden, brei verder in wit, 7r, kruis draden, werk verder in rood. haal 1 rode steek af, brei 1 steek rechts, haal vorige steek over. Draai.
8 : 1 rode steek afhalen, de volgende witte steek averechts in rood breien, kruis draden, brei 5 st averechts in wit, kruis draden, de volgende witte steek averechts in rood breien, de volgende 2 averechts samen breien in rood. Draai.
 |
| the nose of the shoe is shaping well. |
10 : Only red from now on. You can cut the white thread. Slip 1 stitch, p7, p 2 together, turn.
9 : Haal 1 steek af, brei de 2 volgende steken in rood, kruis je draden, brei 3 steken rechts in wit, kruis je draden, brei de volgende 2 steken rechts in rood, haal 1steek af zonder breien, brei 1, haal de vorige lus over. Draai.
10 : vanaf nu is alles in rood. je mag de witte draad afknippen. haal 1 steek af, 7 averechts, 2 averechts samen breien. Draai.

11 : slip 1, k7, slip 1, k1, pass over slipped stitch. Turn.
12 : slip 1, p7, p 2 together, turn.
13 : slip 1, k7, slip1, k1, pass over slipped stitch. Turn.
14 : slip 1, p7, p 2 together. Turn.
15 : slip 1, k7, slip 1, knit 1, pass over slipped stitch, knit to the end of the row.
16 : p 21, purl 2 together, purl to the end of the row. You have now 35 stiches on the needle.
11 : 1 steek afhalen, 7 rechts, 1 steek afhalen, 1 breien, de vorige steek overhalen. Draai.
12 : 1 steek afhalen, 7 averechts, 2 samen averechts breien, draai.
13 : 1 steek afhalen, 7 rechts, 1afhalen, 1 breien, de vorige steek overhalen. Draai.
14 : 1 steek afhalen, 7 averechts, 2 av. samenbreien. Draai.
15 : 1 steek afhalen, 7 rechts, 1 afhalen, 1 breien, de vorige overhalen, brei tot het einde van de rij.
16 : 21 averechts, 2 av samenbreien, av. tot het einde van de rij.
Je hebt nu 35 steken.
 |
| I know it looks very funny. But that's ok. Have a good laugh. |
Knit 11 stiches in red, yo, knit 2 stitches toghether, knit 1. Put all the remaining stiches on the safety pin.
Nu brei je het zijkantje van het schoentje. Je gaat 3 kleine gaatjes maken om de vetertjes door te rijgen.
in rood : brei 11 steken rechts, maak een lus, brei 2 steken rechts samen, brei 1 steek. Zet alle overige steken op de stekenhouder. Die heb je even niet nodig.

continue as follows :
purl.
k11, k 2 togehter, k1
purl
k 10, yo, knit 2 toghether, k1
purl
k 10, k 2 together, k1
purl
k 9, yo, k 2 together, k1
purl
k 9, knit 2 together, k1
knit the next row.
Knit and bind off. (the last 2 rows are knitted to form a little bord.)
vervolg :
brei averechts
11 rechts, 2 samenbreien, 1 r
averechts
10 r, lus maken, 2 samenbreien, 1r
averechts
10 r, 2 samenbreien, 1r
averechts
9r; 1 lus, 2 samenbreien, 1r
averechts
9r, 2 samenbreien, 1r
volgende rij rechts
volgende rij rechts afkanten.
De laatste 2 rijen zijn rechts om een boordje te vormen.
 |
| binding off. |
pick up 14 stiches from the stichholder. (leave 7 stiches on it)
k1, slip 1 stitch, k1, pass over, yo, k11
purl
k1, slip 1 stitch, k1, pass over, k11
purl
k1, slip 1 stitch, k1, pass over, yo, k10
purl
k1, slip 1 stitch, k1, pass over, k10
purl
k1, slip 1 stitch, k1, pass over, yo, k9
purl
k1, slip 1 stitch, k1, pass over, k9
knit
knit and BO
Brei nu de andere kant.
14 steken oppakken (laat er 7 op de hulpnaald)
1rechts, 1st afhalen, 1r, de lus overhalen, maak een lus, 11 rechts
averechts
1 rechts, 1 st afhalen, 1r, de lus overhalen, 11 rechts
averechts
1 rechts, 1 st afhalen, 1r, de steek overhalen, lus maken, 10 rechts
averechts
1 rechts, 1 st afhalen, 1r, de steek overhalen, 10 rechts
averechts
1 rechts, 1 st afhalen, 1r, de steek overhalen,lus maken, 9 rechts
averechts
1 rechts, 1 st afhalen, 1r, de steek overhalen, 9 rechts
rechts
rechts en afkanten |
| pick up 14 stiches |
 |
| you make 3 little eyelets on one side for the shoelaces |
With the remaining 7 stitches, you will make the little tongue
r 1: knit 7
r2 : purl 7
r3 : k1, p5, 1r
r4 : k7
r5 : k1, p5, k1
r6 : k7
r7 : k1, p5, k1
r8 : k7
r9 : k1, p5, k1
r10 : slip 1 stitch, k1, pass over, k3, knit 2 together
r11 : purl
r12 : BO
Met de laatste 7 steken brei je het lipje.
r1 : 7 rechts
r2 : 1r, 5av, 1r
r3 : 7 rechts
r4 : 1r, 5av, 1r
r5 : 7rechts
r6 : 1r, 5av, 1r
r7 : 7 rechts
r8 : 1r, 5av, 1r
r9 : 7 rechts
r10 : 1 st afhalen, 1breien, de vorige st overhalen, 3r, 2r samenbreien
r11 : averechts
r12 : rechts afkanten  |
| finished ! |
 |
| Make another identical one. |
 |
| stop de draadjes in. carefully weave in ends |
 |
| sew back seam, naai achterkant dicht |


 |
| sew bottom seam, naai onderkant samen. |
 |
| add 2 laces - 2 lintjes als veters inrijgen |
 |
| if you want, you can sew 2 felted rounds on each side to complete the look. |
Well, that's it folks ! Good luck with making your booties ! It's been a long explication, and I do hope that everything is clear. But if you find a mistake, or if something is not clear, please let me know !

Thank you sooo much for this tutorial! It's awesome! I am pretty new to knitting and neither English nor Dutch is my first language, but I was able to follow this and now I have two super cute Baby Chucks for my friend. You can see them on Ravely, my nick is Aromali.
BeantwoordenVerwijderenThanks again! Johanna
Thanx for sharing this tutorial! finding cute stuff to knit for girls is pretty easy, but for boys it appears to be a bit harder... I attempted altering two patterns I have for baby booty's so they would look like sneakers, but the results... well quite frankly, not exactly what I hoped for... But I will have a third go at it with your tutorial, three times a charm?? :-)
BeantwoordenVerwijderenerg leuk schoentje!
BeantwoordenVerwijderenheb m zelf nu ook gebreid, maar volgens mij zit er een foutje in het patroon en mis ik een mindering tussen 5 en 6
BEDANKT VOOR DE UITLEG IS EEN HEEL MOOI RESULTAAT HEB NET GEMAAKT VOOR MIJN KLEINKIND DIE OVER 2 MAAND WORDT GEBOREN
BeantwoordenVerwijderenIk ben inmiddels aangekomen bij het breien van het zijkantje van het schoentje maar..... wie kan mij zeggen hoe ik een LUS moet maken???
BeantwoordenVerwijderendank je wel voor het patroon, ik heb het met plezier gemaakt. meerdere keren, meerdere kleinkinderen op komst, zou het ook wel iets groter willen maken, ben nog aan het puzzelen.
BeantwoordenVerwijderen