Quote of the day

In the rhythm of the needles

there is music for the soul.


Breiclub in Oostende : om de 2 weken de zaterdag van 10 u - 12.30 u in de bieb


maandag 31 december 2012

tres leches cake

The knitting club of Bruges is a very international meeting.  There are people from all over the world, gathering for a cosy afternoon filled with stories and a lot of knitting.


Miguel, who makes this all available, made a wonderful cake.  He called it a 'tres leches' cake.  It is a Mexican recipe, from Miguels homeland.

Tres meaning 3 (of course) and leches means milks.  This cake is made with 3 sorts of milks.  (I didn't even realise there were so many milks...)


It was simply devine !  Soft, milky, and a little touch of rum.  Miguel sent me the recipe and I pinned it on my pinterest board 'recipes' if you want it.  link here : my recipes


This is my experiment.  It will be eaten next year (tomorrow that is) at the afternoon tea with my in-laws. 
Maybe I should add an extra drop of rum.....

Oh, and yes, the cat found the leftover milk mixture and had a ball !

Enjoy the new year everybody - and I wish you all a lot of knitting and other pleasures in life !


maandag 17 december 2012

a quick last minute Xmas decoration

This candle holder started out as a glass jar of vegetables I bought at the supermarket.


Clean it thouroughly, remove the paper label.
choose a yarn in a Xmassy-colour, and a crochet hook

for my Flemish and Dutch readers : translation is marked in green ! 

Start with chain stiches, measure the circumference of the jar, at its widest part.
Begin met kettingsteken, meet op het breedste deel van de bokaal.

measure carefully, not too tight
crochet as follows : 1 double crochet, 1 chain stich, skipp 1 stich,   repeat until the end.
haak als volgt : maak een stokje, een kettingsteek, sla een steek over, maak een stokje, enz...

close with a  slipstich, make a single crochet in the first opening, make 3 chain stiches and repeat the proces until the piece is long enough to cover the whole jar.
Sluiten doe je met een halve vaste, dan een vast in de eerste opening, 3 kettingsteken en je bent weer vertrokken.  Vanaf de 2e toer kun je het stokje in de opening van de vorige toer maken, je hoeft niet in een steek te steken en daardoor werk je veel sneller.

measure carefully in the beginning, always at the widest part of the jar.

close with a slip stich

make a single crochet in the first opening

3 chain stiches and off you go, repeat the dc/1chain all around
from this point you can make the double crochet in the opening of the previous round, you don't have to find the right stich, so this works very fast.

careful you don't twist the work, you don't want a moebius !

check if it's ok
finishing with a reverse crochet (sc backwards)
Afwerken kun je met de kreeftensteek, maar dat hoeft niet echt.
Kies een leuk lintje, een decoratief hartje, een kerstballetje, zelfs een oude oorbel kan je hier aanhangen.

now the body is finished, you can decorate it with a ribbon, an old earring, a shining little hart, or anything you have in your craft left-overs box....

an easy way to weave in the ribbon


with a little candle inside, the light makes a  pattern on the table

even an old brooche can add a shining touch

once you made 1, you can't stop....
Of course you can do this with little jars, an put a little candlelight in it.  I added a little bit of sand at the bottom of the jar, so that the candle was steady.
Je kan natuurlijk ook andere bokaaltje kiezen, kleine en grote, volgens je goesting.  Ik deed een klein beetje zand op de bodem van de bokaal zodat het kaarsje stabiel blijft staan. 

Have fun making this !

maandag 19 november 2012

a knitted bunny rabbit - for beginners !

This little bunny is so easy to make, it is a perfect beginners project !


All you have to do is knit a square.  Here I cast on 30 stiches with ndl 3 mm
and I knitted until I had a square.


The magic is in the sewing !  Use a blunt needle, it will pass through the fabric easier.


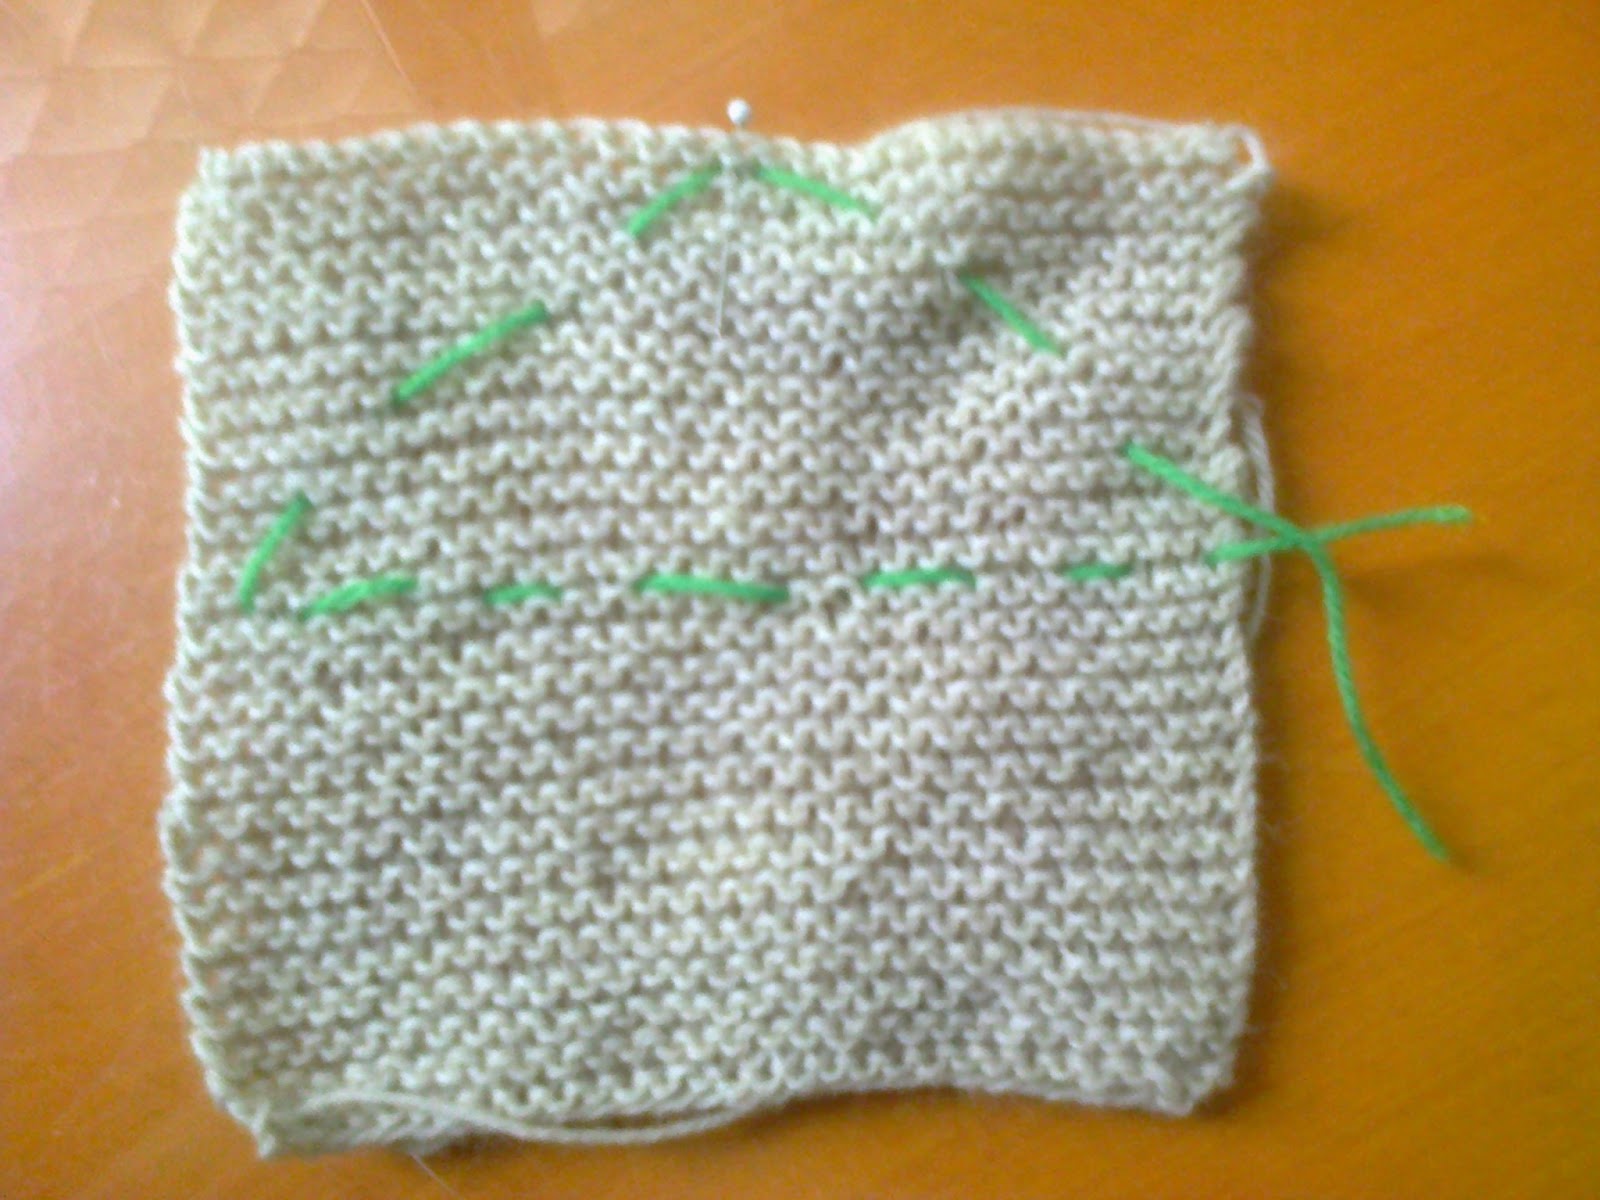
Here you see where you have to sew.  You must form a triangle, begin with a straight line in the middle, then mark the middle of the top with a pin. I used contrasting coloured yarn so you can see it better.


 These green stiches are big to show you where to stich.
When you do it, use the wool that you knitted with, and make the stiches a bit smaller.  Just go up and down through the fabric.

Here  I used a magazine to form a straight line, you can use a ruler too.

 just go up and down with the needle.  Make small stiches.

 Now, gently pull the thread, hold both ends, and you will see the form of the ears and the head appear.
 You will need some stuffing material too.

 See the head appear ?  Put some stuffing in the little head, and close the gap with a few stiches.

 
 Now continue along the upper part of the body.  Close this with small stiches.
when you use the same thread the stiches will be pretty invisible.

 Stuff this also.

 Now to close the rear end: go around the gap with your needle, go up and down through the fabric.
when you are back at the beginning, gently pull and the circular gap will close.


add a few stiches to make sure it is close. cut off thread.

 Now add 2 tiny stiches at the base of the ears, to make them stand up more. This is not really necessary, if you don't want to do that, the bunny will be cute without it too.

 for the tail, you can add a little pompom, a button, or needlefelt some mohair as I did here.


You might want to add a face : just sew in 2 little black pearls, for the mouth just sew an 'x' in pink.  Give it a good push, so that the stuffing finds its place and forms a flat area so that the bunny can sit up straight without tumbling over. 


Have fun making this !

maandag 5 november 2012

a knitted bird house

What can one do with all the samples one has knitted ?  I have a pile of  little odd squares, in all kinds of stiches and colours. 

When I visited the local book store the other day, I noticed a little construction kit for children : make your own bird house. 

Put 2 and 2 together and this is the result :

reading a groundplan....

just a little touch of red needed for the roof
sewing together the sides

et voilà - the coziest birdhouse in the village !
seen from the back

and from the top
Now I must find a quiet and dry spot to hang it , where my cats can't reach....

zondag 4 november 2012

a felted bag

Last friday, I spent a day at Mieke Recour's atelier, making a felted bag.  I really enjoyed this, although it was pretty hard work.  We started from scratch : first we made a design,  then we choose our colours and worked our way through the many layers of wool, with the aid of soap, and hot water.

It was funny to see that we all had a different bag in the end.

this is how mine ended up.

our hands were sooo soft afterwards !
with an orange inside

Mieke came to help with the details

pretty in pink

everything is felted

a wonderful bag this is !

in black 'n white

with curly endings

this finishing touch !

accents in real sheeps wool

rolling and hitting the felt

and more soap...

Mieke at her table

so, what do you think ?

the black beauty

artistic !

nearly finished !

this one is ready, pffff - now it has to dry

We enjoyed the day very much, it was well organised and we were all proud to go home with the great bags !
Related Posts Plugin for WordPress, Blogger...