de Duitse firma Prym heeft de breinaalden heruitgevonden. Na 200
jaar mocht er wel eens een update komen, er zijn immers zoveel nieuwe
materialen en inzichten in hoe pezen en spieren worden belast. Een goed
idee, maar of het een échte verbetering is, valt allemaal te bezien.
The proof of the pudding is in the eating zeggen ze in Groot-Brittannië.
Ik
kreeg de kans om ze uit te proberen : een mooi doos met de set korte
kousennaalden, een rondbreinaald en een set rechte naalden - allemaal nr
5.
Eerste indruk : ze zijn mooi verpakt, en voelen erg soepel en zacht aan.
De rechte naalden :
daar
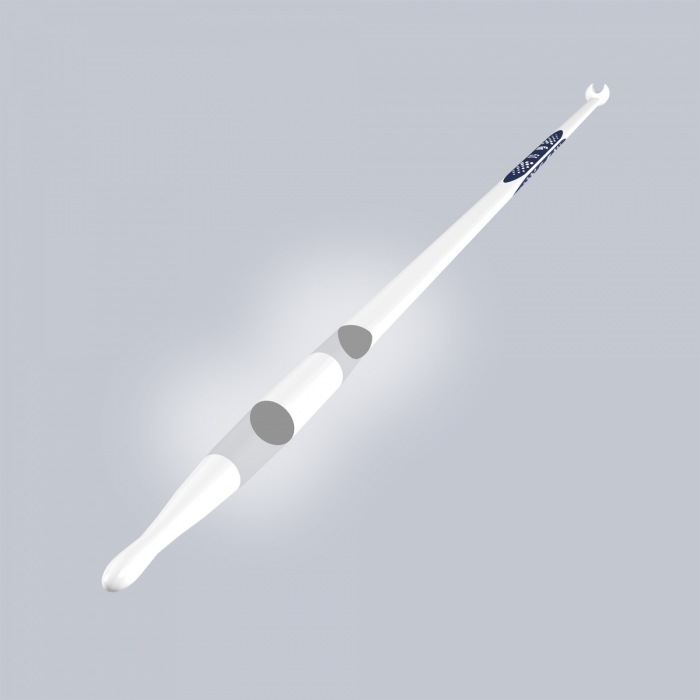
valt veel over te zeggen : ze zijn licht, flexibel en liggen
onmiddellijk goed in de hand. Als je goed kijkt, zijn de naalden niet
overal rond. Het midden is driehoekig (prisma) en in het midden is een
blauw label opgedrukt met heel duidelijk het nummer van de naald en het
merk. Naar de punt toe worden ze weer rond. De steken schuiven erg goed
over de naald.
De
punt zelf is ook eigenaardig : er hangt een druppelvormig bolletje
aan. Nu werk ik graag met lace-naalden : die hebben een ultra scherpe
punt, waarmee je de steek mooi opschept, en waarmee je allerlei zaken
makkelijk kan uitvoeren : de steek in de achterste lus breien, de steken
samenbreien, de steek gedraaid breien.... Met dit bolletje aan de top
was het even zoeken, en het lukt uiteindelijk wel. Dat was voor mij het
meeste wennen. Nu is een naald nr 5 natuurlijk ook niet direct om met
fijne wol te breien.
nog
een extraatje : als je de naalden opbergt, met of zonder je breiwerk
eraan, kun je ze mooi in elkaar klikken, met de 'clickheads' . Das echt
handig, nooit rolt er nog een naald weg, of vind je de 2e naald niet in
je opbergsysteem. (bij mij een grote vaas)
minpuntje :
als je een heel rugpand aan de naald hebt hangen, weegt dit echt wel
door. Door het flexibele materiaal buigt de naald ook een beetje door.
pluspuntje : je naalden 'tikken' niet. Je kan geluidloos breien !
De
rondbreinaalden zijn op dezelfde manier uitgevoerd : het ronde
druppelvormige bolletje aan de punt, het ronde begin van de naald gaat
na enkele cm over in een driehoekige naald. Het belangrijkste punt van
een rondbreinaald is de overgang van naald naar kabel, en dat is erg
goed uitgevoerd. Je voelt de transitie bijna niet. De steken schuiven
bijzonder goed over dat heikele punt. De kabel is uitgevoerd in staal,
en daardoor heb je dat vervelende spiraaleffect niet. Wat een heel
pluspunt is bij het opzetten van je steken.
De
korte kousennaalden (je kan er ook een muts mee breien, of een ander
klein project) zijn op dezelfde manier vervaardigd. Licht, soepel, net
goed van lengte om goed in de handen te liggen.
De steken schuiven goed, maar vallen niet van de naalden. Ook hier zijn de punten vervangen door de bolletjes.
Die
bolletjes. tja. Het was even wennen, maar met de lange naalden merkte
ik eigenlijk al snel weinig verschil, het breien van rechtse en
averechtse steken ging even snel en soepel. Als je gewoon doorbreit,
wordt je het erg snel gewoon. De meerwaarde ligt vooral in het
materiaal waarmee je breit : je hebt van die wol/katoen soorten die erg
los getwijnd zijn en 'open' draadjes vormen. Als je snel breit, heb je
soms een steek maar half mee, en dat houdt je hand serieus tegen. Met
die bolletjes aan de punt vermijd je dat voor een groot stuk wel.
Als
je echter de steken moet gaan manipuleren, blijft het wel uitkijken.
Afhankelijk van de wol waarmee je breit, moet je toch goed opletten dat
je de steek in 1x mee hebt. Het leek me wel of die bolletjes de steek
makkelijker lieten vallen. Ik moest de wol een beetje 'meehelpen' met
mijn vingers om een verdraaide steek te breien. Een gevallen steek
ophalen is ook moeilijker met zo'n bolletjes aan je punt. Zo'n gevallen
steek wordt erg klein, en je kan hem vaak met een scherpe punt nog nét
redden, met deze naalden is dat niet mogelijk.
even verder gebreid aan mijn fair-isle trui met deze naalden : geen enkel probleem, het ging prima.
Conclusie
Deze
breinaalden ogen niet alleen mooi, ze hebben zeer goede kwaliteiten.
Net zoals met alles wat nieuw is zullen de mensen uitproberen, en moet
je vooral voor jezelf uitmaken of ze de aanschaf waard zijn of niet.
100
% perfectie bestaat niet, altijd zul je wel merken dat iets nog beter
kan. Maar deze naalden waren erg fijn om uit te proberen, en ik zal er
wel enkele aanschaffen. Vooral de rondbreinaalden en de rechte naalden
in de grotere nummers lijken mij persoonlijk een superdeal.
Al bij al is het fijn dat grote firma's zich de vraag stellen hoe ze
kunnen verbeteren. Als ze breinaalden de moeite waard vinden om in te
investeren, om een research team samen te stellen en designers aan het
werk zetten om met een vernieuwend concept op de markt te komen, kan je
dat alleen maar toejuichen.
blog over handwerken, breien, haken, naaien, vilten, borduren, juwelen maken en allerlei andere creatieve vaardigheden.
Quote of the day
In the rhythm of the needlesthere is music for the soul.
Breiclub in Oostende : om de 2 weken de zaterdag van 10 u - 12.30 u in de bieb
dinsdag 31 januari 2017
maandag 21 november 2016
mosaic knitting - de mozaiek techniek
Every now and then I like to participate in a knit along. (Not a mystery knit, I did that twice and didn't like the result.) Just some people who are knitting the same item, sharing details, getting feedback from the designer. Great !
On the LMB designs blog I found a nice small project for a pair of mittens in a technique called 'mosaic knitting'. Not difficult, just follow the pattern and use the right colour.... only one colour is knit per row.
It was fun, not too difficult and perfect size for my hands.
Lisa from LMB designs a lot using the expensive but gorgeous NORO. (Japanese silk + wool dyed in amazing colours) I wanted to try the mittens first in a cheaper merinos that I had in my stash, before starting them up in Noro.
You can buy the pattern here. Maybe I'll knit some more, as the holiday season is getting near... they make a lovely gift.
More mosaic knitting ....
On the LMB designs blog I found a nice small project for a pair of mittens in a technique called 'mosaic knitting'. Not difficult, just follow the pattern and use the right colour.... only one colour is knit per row.
It was fun, not too difficult and perfect size for my hands.
Lisa from LMB designs a lot using the expensive but gorgeous NORO. (Japanese silk + wool dyed in amazing colours) I wanted to try the mittens first in a cheaper merinos that I had in my stash, before starting them up in Noro.
You can buy the pattern here. Maybe I'll knit some more, as the holiday season is getting near... they make a lovely gift.
![]() |
| started in Noro.... |
![]() |
| black & white, a great contrast |
![]() |
| more ideas.... |
vrijdag 4 november 2016
kunstzinnige collier
Ik heb me eens aan een halsketting gewaagd. Het is een superleuk en behoorlijk eenvoudig model, van Anne Thompson. Haar ontwerp heet Lunar.
De 'wol' is een klosje rood garen van bij Bart&Francis. Zo'n cone die je meeneemt omdat je het leuk vindt, een gekke combinatie van allerlei synthetisch materiaal. Heeft-ie eindelijk een bestemming gevonden.
Het fel rood komt mooi uit bij de meeste van mijn outfits.
De beschrijving is erg goed, met stap voor stap uitleg. alles is gebreid op rondbreinaalden met de magic loop techniek.
woensdag 2 november 2016
een trui top-down breien
Brei een
trui van boven naar beneden : het kan en het is super gemakkelijk. Wie uitleg wil, of een workshop wil plannen, kan me contacteren op 0477 825 850.
Je gebruikt rondbreinaalden, je kan volledig
op maat werken (je past terwijl je breit) en er zijn geen vervelende zijnaden
om te sluiten.
Je kan
deze basis tutorial gebruiken voor elke soort wol, elke soort naalddikte. Je kan kiezen tussen een v-hals of een ronde
hals, een trui of een vest.
Begin : het is erg belangrijk om een goed proeflapje te breien. Brei het groot, zo’n 30 cm². Brei het met de naalden waarmee je de trui
gaat breien. Meet nauwkeurig het aantal
steken voor 10 cm breed, en het aantal rijen voor 10 cm hoog. Tip : indien nodig : Block je proeflapje of
stoom het voorzichtig met een niet te heet strijkijzer.
Materiaal:
- Voldoende wol om je trui te Breien.
- Rondbreinaalden in de juiste
dikte. (A)
Een rondbreinaald 60 cm om op te zetten, een rondbreinaald 80 of 100 cm voor het lijfje. 2 grote stekenhouders voor de mouwen. - Een rondbreinaald van een halve cm minder om de boorden af te werken. (B)
- Optioneel : een langere kabel voor je rondbreinaalden als je de trui wilt kunnen aanpassen. (ka nook als je de steken op een draad zet)
- Vaste stekenmarkeerders (die niet open kunnen)
Stekenverhouding:
- Zie je eigen proeflapje : ………………st x …………..rijen.
- Bereken het aantal steken/rijen voor (uitleg tijdens workshop)
A
B
C
D
E
F
WERKWIJZE
·
Zet aantal
steken A op, verdeel in 5 delen (voorpand, mouw 1, nek, mouw 2, voorpand. Plaats
markeerders. Zorg ervoor dat er telkens 2 steken tussen de markeerders zitten.
Brei heen
en terug in jersey, meerder in de rechtse rijen aan elke kant van de
markeerders een steek, en aan de hals 1 steek voor de v-nek. Je meerdert dus 10
stk per rechtse rij.
Meerderen : verschillende opties worden in de workshop uitgelegd
Voor
ronde hals : Brei
tot je aan de gewenste nekdiepte komt. Tel je aantal steken voor de nek, en tel
je aantal steken voor het voorpand. Het verschil
is het aantal steken dat je nu moet bijzetten. Vanaf hier kun je gaan rondbreien.
Voor V-nek
trui: Brei tot
je evenveel steken hebt vooraan als in het nekgedeelte. Brei vanaf hier in het rond.
Voor vest
: Brei tot je evenveel steken hebt vooraan als
achteraan, blijf heen en weer Breien. .
Brei
verder in het rond, meerder telkens aan de raglan tot je het gewenste aantal
steken hebt voor de panden [C min F] en
mouwen [D min F], brei verder zonder meerderingen tot je de gewenste
halspasdiepte hebt. [E]
Verdeel
panden en mouwen : je mag de raglan
markeerders weghalen tijdens het breien. Brei tot de eerste raglanmarkeerder, zet de
steken voor de mouw op een houder. Zet
onderarmsteken bij [F], plaats een markeerder in het midden van deze
onderarmsteken, brei de rugpandsteken tot aan de volgende markeerder, zet de
mouwen op een houder. Zet evenveel
steken bij, plaats een markeerder in het midden en brei verder .
Lijf : Brei verder tot het lijfje
de gewenste lengte heeft. Tip : brei aan weerskanten van de markeerder een
averechte steek. Dat geeft meer
structuur en je werk trekt nooit schuin. Ja kan hier ook een mindering voor de
taille verwerken. Werk af met een boord
naar keuze. Kant soepel af.
Mouwen: zet de steken op een naald,
neem telkens een steek van de bijgezetten onderarmsteken op en werk verder in
het rond. Brei de mouwen verder, kort of lang. Verdeel enkele minderingen als je lange mouwen
breit. Brei een boord op het einde. Kant
soepel af.
Afwerking
: brei een boord aan de hals van je trui.
zaterdag 6 augustus 2016
la Compagnie des Laines
Traveling to the Ardennes, we went all across our little country. From where I live (in the middle of our North Sea coast) to the furthest point is 350 km. That is the province of Luxemburg, not the same as the neighboring Grand Duchesse de Luxembourg, which is an entirely different country.
The Ardennes are also well know for the Ardennes offensive by General Patton, when in WWII the American soldiers tried (successfully) to liberate us from occupying Germans. It is known as 'the battle of the Bulge'.
In my part of Belgium (called Flanders) we speak Flemish, a language very similar to Dutch. The other half of my country is called Wallonië, and people there speak French. Our capital city Brussels is right in the middle.
Flanders is a flat country, Jacques Brel made such a beautiful song about it : Mon plat pays.
Wallonië has forests, hills, little villages, and a more relaxed way of living. Ideal for a holiday.
In Virton, a quiet sleepy village far away in the forests, there is a yarn shop. Not just an ordinary yarn shop, but a hidden cave of gems.
It is called 'la Compgnie des Laines'. They have a website and webshop HERE.
My husband sat quietly waiting for me - I had to choose among so many awesome yarns. And they had a great collection of needles (hyahya !) bags, pins to put on a scarf...
There were still a bit of sales too.... like 4 euros for a 100 gr skein of Kauni....
Books Books Books.....
Some very very nice knit scarfs too. I bought 2 patterns and the yarn to knit both scarves : the loop-stich Frida by Hiroko Fukatsu and the beautiful Tamdou by Melanie Berg - one of my favorite scarf designers.
For the Tamdou I could choose among the many colours available of their own label.
My husband came to help an I went home with Amarante red, Etain grey and Sahara yellow of the 'Assemblage 1' line. It's a 50 gr cake of 250 meters of 80% merinos and 20% linen. So I will have the softness of the merino and the flow of the linnen combined for this project.
For the Frida I might use the Kauni. And I still have some silk from Bart&Francis at home that may turn into one of these scarves....
I bought a kit to knit wrist warmers with a pattern of rocailles knit into them.
and last but not least a kit with everything in it to make myself some Sanquehar gloves.... with needles 0.7 mm..... How adventurous is that ?
and now for some time to make all these beauties.....
The Ardennes are also well know for the Ardennes offensive by General Patton, when in WWII the American soldiers tried (successfully) to liberate us from occupying Germans. It is known as 'the battle of the Bulge'.
![]() |
| the hills of the Ardennes |
![]() |
| From Oostende to Arlon is about 350 km |
In my part of Belgium (called Flanders) we speak Flemish, a language very similar to Dutch. The other half of my country is called Wallonië, and people there speak French. Our capital city Brussels is right in the middle.
Flanders is a flat country, Jacques Brel made such a beautiful song about it : Mon plat pays.
![]() |
| My flat country... |
Wallonië has forests, hills, little villages, and a more relaxed way of living. Ideal for a holiday.
In Virton, a quiet sleepy village far away in the forests, there is a yarn shop. Not just an ordinary yarn shop, but a hidden cave of gems.
It is called 'la Compgnie des Laines'. They have a website and webshop HERE.
My husband sat quietly waiting for me - I had to choose among so many awesome yarns. And they had a great collection of needles (hyahya !) bags, pins to put on a scarf...
There were still a bit of sales too.... like 4 euros for a 100 gr skein of Kauni....
Books Books Books.....
![]() |
| that one was still missing from my collection.... |
Some very very nice knit scarfs too. I bought 2 patterns and the yarn to knit both scarves : the loop-stich Frida by Hiroko Fukatsu and the beautiful Tamdou by Melanie Berg - one of my favorite scarf designers.
![]() |
| Tamdou by Melanie Berg |
For the Tamdou I could choose among the many colours available of their own label.
![]() |
| sooo much to choose from |
![]() |
| drool drool |
For the Frida I might use the Kauni. And I still have some silk from Bart&Francis at home that may turn into one of these scarves....
I bought a kit to knit wrist warmers with a pattern of rocailles knit into them.
and last but not least a kit with everything in it to make myself some Sanquehar gloves.... with needles 0.7 mm..... How adventurous is that ?
![]() |
| Back at the hotel, I enjoyed just looking at it. |
and now for some time to make all these beauties.....
zondag 17 juli 2016
workshop Loret Karman
I'm a teacher. It's my profession, it's what I do.
I trained to be a teacher. Whether it's teaching children about languages, or adults about knitting, you need to be prepared. And focused. And attentive to the needs of the pupils. And never loose your sense of humor.
That is why I like other teachers. I like to learn from others, I am in awe of those who can teach me new things. New ways. Other points of view. People like Franklin Habit, who are so graciously willing to share their knowledge on the web. All the anonymous men/women who put together great YouTube movies, explaining patiently over and over again how to make those intricate stitches. I very much appreciate well structured classes on craftsy. A nice voice. Positive people.
What I don't like is when lessons are ill-prepared. When wrong or incomplete information is given. When chaos rules. When you are requested to 'just do what you like - because that's 'artistic'. When I regret the money I spent.
So, sometimes I treat myself to a workshop by 'a big name'. When I pay a lot of money for a workshop, my expectations are really high.
Usually I enjoy this very much. I like meeting other - like-minded - people, share information and absorb the classes.
But not always.
The latest workshop I followed can easily be compared to an episode of Fawlty Towers. It took me some time to digest it. I went from being angry (spent soo much money for nothing! ) to being upset (how can you mess up a workshop) to 'try and think positive' (met some very nice knitters) to finally see the humor of it all.
Let me share this with you.
We got a long list of 'items' to bring to the class. Did we use any of it ? No.
We received instructions to knit a homework. It took me a lot of time to knit quite an intricate lace swatch in 5 different colours. Did we discuss it ? No.
the 1st part of the class was all about pooling. That's what you get when knitting with hand dyed wool. When the dye changes after a certain amount of cm, and you knit swatches with it, the effect can change dramatically from stripes to diamond shapes. The reason can be the pattern you knit, or the amount of stitches you cast on.
Knitters who knit with pre-dyed sock wool will have experienced this. It would have been very interesting if we would've received tips and tricks how to manipulate this. Sadly, we didn't...
In stead, we had to knit a swatch.... in the wrong wool.... and all the swatches looked the same : stripes. Nobody had the diamond-effect. The teacher explained that it was because the wool was dyed at too long colourchanges. Oops. Would that be like ordering lobster and receiving a hamburger instead ? That's what I felt... Also came to mind : preparation is the key to succes.
Next, we were going to knit a swatch in ribbed intarsia : colour blocking. Not many of the knitters were familiar with this technique. In stead of taking time to explain, the teacher suddenly abandonned this - let's all do something completely different !
That something completely different was dying a machine knitted natural swatch with very intense blues and oranges. When you pay for a workshop 'KNITTING with hand dyed yarn' you somehow don't expect to be DYEING it yourself. I wouldn't have taken the workshop it I had known it was about dyeing. I'm not interested in dyeing. I'm a knitter who buys her wool - thank you.
And btw : I wasn't dressed to dye. I was wearing white. There were no aprons available. Again, thank you !
The swatch was machine knitted in double thread - when you unravel this, you should obtain 2 equally neatly dyed threads of wool, and be able to knit 2 similar tiny little socks. That is, if you take your time to dye both layers of thread with enough moisture, so that the bottom layer can soak up enough dye. If you're not careful, you will end up with one dark sock, and one light sock. Logic. Only, she didn't tell us when we were painting à gogo. She told us afterwards. Yep.
And to my humble opinion, the swatches were knit at a much too tight tension. It may have been easier to dye both layers when they are loosely knit. But, hey - who am I ? Just getting a bit frustrated.... turning into a grumpy old woman here ?
While we were waiting for that swatch to dry (a tiny little remark : when making your pupils dye, do it in the morning : then the swatches might be dry by the time they go home. If you make them dye in the late afternoon, the chances are that the paint is still wet when goodbyes are said, and people might find it difficult to wrap them in a plastic container and put it into a handbag).
Because not everybody could paint at the same time, the others members of the knitting-turned-dying workshop were handed a few little skeins of wool and a pattern to knit. Ah - finally - knitting. Only to find that it was just copying written instructions, knitting with short rows, again, some kind of swatch. ok, nothing wrong with that. Only some of us were handed nice bright colours, others were handed more demure and dark colours. At the end of the day, half an hour was spend discussing these swatches. Apparently, some of the swatches looked very shy. Others were considered dull. When handed 5 shades of grey (pun not intended) it's difficult to knit a bright and happy swatch ! Half an hour of judging, criticizing and lamenting about these swatches. Was it because we were all ready at 16.00 hrs, and the workshop was supposed to end at 16.30 hrs ? Tssss.
Mrs. Loret Karman is an amazing hand dyer. She makes wools that are gorgeous. Especially the ones inspired by the paintings of Vincent Van Gogh. She knows about colours, and how they interact. Her knowledge is great. Her teaching skills are not. Maybe she had an off day. Maybe I'm too critical. Anyways, this is one workshop I will remember, and have a lot to talk and think about.
Notes to self.
Ok. What did I learn today ? Not a lot.
Did I meet nice people ? Yes.
Does everything always need to be perfect ? No.
Will you take one of her classes again ? Never ever ever.
I trained to be a teacher. Whether it's teaching children about languages, or adults about knitting, you need to be prepared. And focused. And attentive to the needs of the pupils. And never loose your sense of humor.
That is why I like other teachers. I like to learn from others, I am in awe of those who can teach me new things. New ways. Other points of view. People like Franklin Habit, who are so graciously willing to share their knowledge on the web. All the anonymous men/women who put together great YouTube movies, explaining patiently over and over again how to make those intricate stitches. I very much appreciate well structured classes on craftsy. A nice voice. Positive people.
What I don't like is when lessons are ill-prepared. When wrong or incomplete information is given. When chaos rules. When you are requested to 'just do what you like - because that's 'artistic'. When I regret the money I spent.
So, sometimes I treat myself to a workshop by 'a big name'. When I pay a lot of money for a workshop, my expectations are really high.
Usually I enjoy this very much. I like meeting other - like-minded - people, share information and absorb the classes.
But not always.
The latest workshop I followed can easily be compared to an episode of Fawlty Towers. It took me some time to digest it. I went from being angry (spent soo much money for nothing! ) to being upset (how can you mess up a workshop) to 'try and think positive' (met some very nice knitters) to finally see the humor of it all.
Let me share this with you.
We got a long list of 'items' to bring to the class. Did we use any of it ? No.
We received instructions to knit a homework. It took me a lot of time to knit quite an intricate lace swatch in 5 different colours. Did we discuss it ? No.
the 1st part of the class was all about pooling. That's what you get when knitting with hand dyed wool. When the dye changes after a certain amount of cm, and you knit swatches with it, the effect can change dramatically from stripes to diamond shapes. The reason can be the pattern you knit, or the amount of stitches you cast on.
![]() |
| pooling explained : same wool, different result |
Knitters who knit with pre-dyed sock wool will have experienced this. It would have been very interesting if we would've received tips and tricks how to manipulate this. Sadly, we didn't...
In stead, we had to knit a swatch.... in the wrong wool.... and all the swatches looked the same : stripes. Nobody had the diamond-effect. The teacher explained that it was because the wool was dyed at too long colourchanges. Oops. Would that be like ordering lobster and receiving a hamburger instead ? That's what I felt... Also came to mind : preparation is the key to succes.
![]() | |
| we all had the same stripey effect |
![]() |
| luckily, teacher had her own swatches with the pooling effect. |
Next, we were going to knit a swatch in ribbed intarsia : colour blocking. Not many of the knitters were familiar with this technique. In stead of taking time to explain, the teacher suddenly abandonned this - let's all do something completely different !
That something completely different was dying a machine knitted natural swatch with very intense blues and oranges. When you pay for a workshop 'KNITTING with hand dyed yarn' you somehow don't expect to be DYEING it yourself. I wouldn't have taken the workshop it I had known it was about dyeing. I'm not interested in dyeing. I'm a knitter who buys her wool - thank you.
And btw : I wasn't dressed to dye. I was wearing white. There were no aprons available. Again, thank you !
![]() |
| ready to paint. |
The swatch was machine knitted in double thread - when you unravel this, you should obtain 2 equally neatly dyed threads of wool, and be able to knit 2 similar tiny little socks. That is, if you take your time to dye both layers of thread with enough moisture, so that the bottom layer can soak up enough dye. If you're not careful, you will end up with one dark sock, and one light sock. Logic. Only, she didn't tell us when we were painting à gogo. She told us afterwards. Yep.
And to my humble opinion, the swatches were knit at a much too tight tension. It may have been easier to dye both layers when they are loosely knit. But, hey - who am I ? Just getting a bit frustrated.... turning into a grumpy old woman here ?
While we were waiting for that swatch to dry (a tiny little remark : when making your pupils dye, do it in the morning : then the swatches might be dry by the time they go home. If you make them dye in the late afternoon, the chances are that the paint is still wet when goodbyes are said, and people might find it difficult to wrap them in a plastic container and put it into a handbag).
Because not everybody could paint at the same time, the others members of the knitting-turned-dying workshop were handed a few little skeins of wool and a pattern to knit. Ah - finally - knitting. Only to find that it was just copying written instructions, knitting with short rows, again, some kind of swatch. ok, nothing wrong with that. Only some of us were handed nice bright colours, others were handed more demure and dark colours. At the end of the day, half an hour was spend discussing these swatches. Apparently, some of the swatches looked very shy. Others were considered dull. When handed 5 shades of grey (pun not intended) it's difficult to knit a bright and happy swatch ! Half an hour of judging, criticizing and lamenting about these swatches. Was it because we were all ready at 16.00 hrs, and the workshop was supposed to end at 16.30 hrs ? Tssss.
Mrs. Loret Karman is an amazing hand dyer. She makes wools that are gorgeous. Especially the ones inspired by the paintings of Vincent Van Gogh. She knows about colours, and how they interact. Her knowledge is great. Her teaching skills are not. Maybe she had an off day. Maybe I'm too critical. Anyways, this is one workshop I will remember, and have a lot to talk and think about.
Notes to self.
Ok. What did I learn today ? Not a lot.
Did I meet nice people ? Yes.
Does everything always need to be perfect ? No.
Will you take one of her classes again ? Never ever ever.
donderdag 16 juni 2016
breien in Houtave kunstdorp
Houtave wordt zondag 3 juli voor de vijfde keer al omgedoopt tot het Montmartre van de polders. Meer dan veertig kunstenaars strijken er voor één dag neer op een gezellige -autovrije - kunstmarkt. Nieuw is dat dit jaar ook enkele Houtavenaars letterlijk een kunstenaar onderdak zullen geven in een garage, tuin of vrije kamer.
![]() |
| landelijk en authentiek, de perfecte locatie |
Ook in het nieuwe Patchworkatelier van Sophie Van Driessche bent u welkom !
Op zondag 3 juli tijdens het evenement Houtave
Kunstdorp stelt het Patchwork Atelier graag haar toekomstige locatie aan je voor.
Die dag kan je eveneens kennismaken met Rozemie en Martine.
Rozemie is de gast docente die vanaf september brei- en haaklessen zal verzorgen.
Martine zorgt voor een extra creatieve toets
met haar Noordveldberen.
Kom eens langs en doe inspiratie op bij de tentoongestelde werken : prachtige quilts, patchwork tassen en andere projecten, haakwerk en breiwerk, en lieve handgemaakte beren.
Lang geleden dat u nog eens de breipennen vastnam ? Ga de uitdaging aan en leer werken met rondbreinaalden tijdens de tentoonstelling. Ook een spinnewiel staat er om uit te proberen - voor de durvers !
De najaarsagenda met alle cursussen en workshops zal eveneens beschikbaar zijn.
Je kan je die dag reeds inschrijven voor de
diverse workshops.
We hopen jullie te mogen verwelkomen op deze fun-tastische dag. Het hele dorp feest mee : er is gezellige volksmuziek en swingende rhythm&blues, een heus wagenspel 'de klucht van 3 dagen heere' en ander vrolijk straattheater.
Gedetailleerde info vind je op de link van de gemeente houtave-kunstdorp
Creatieve groeten,
Sophie, Rozemie en Martine
Patchworkatelier.be
Kerkhofstraat 24
8377 Houtave
Abonneren op:
Posts (Atom)


