Quote of the day

In the rhythm of the needles

there is music for the soul.


Breiclub in Oostende : om de 2 weken de zaterdag van 10 u - 12.30 u in de bieb


Posts tonen met het label free pattern. Alle posts tonen

dinsdag 30 mei 2017

stitchmarkers DIY tutorial - stekenmarkeerders zelf maken


Always in need of stitch markers ?  I can't  get enough of them.  The little plastic ones are quite ok, but it's sooo much nicer to have beautiful shiny ones.  (this is my inner magpie speaking)
So I made some myself.  Here's how :


Heb je ook van die plastic stekenmarkeerders ?  Ze zijn best ok, maar het is zoveel leuker om je breiwerk te versieren met mooie elegante zelfgemaakte markeerders !  De kleine plastic speldjes durven wel eens van je naalden te springen, en spoorloos te verdwijnen onder zetels of in tassen.  (bij mij toch ;-)


Deze markeerders zijn langer, waardoor ze netjes blijven hangen in je werk.  Als je ze van de ene naald naar de andere overzet, blijven ze door hun gewicht beter zitten.
En je word er gewoon vrolijk van !
Het is helemaal niet moeilijk om ze zelf te maken.  Op Pinterest vind je heel wat tutorials , geef in de zoekfuntie stitchmarkers DIY op. 

Hier is hoe ik ze maakte.   Ik heb een hele grote doos met oude knopen, en een even grote doos met kralen.  Die wou ik recupereren, en met enkele mooie kralen afwerken.   De 'draad' is fishtail, wat je ook gebruikt om juwelen te maken.  Je hebt een tangetje nodig om dat door te knippen, met een schaar gaat dat niet.  Fishtail kun je kopen in de Veritas, of in een winkel die knutselmateriaal verkoopt. Heb je het niet, een stevige katoenen draad werkt ook.

materiaal bijeen zoeken....

Een oude tupperware doos is ideaal voor mijn kralen....

leuke combinaties zoeken


Knip ongeveer 25 cm draad af, en plooi het rond een dikke breinaald. (nr 9 of zo)  Stop beide uiteinden door een pletkraal en knijp vast. 


nu heb je een mooi 'rondje'

als je van plan bent om er meerdere te maken...


Nu rijg je enkele kralen aan, naar eigen smaak en goeddunken.


eindig met een 2e pletkraal, maar knijp die nog niet vast.
 
Ga nu met beide uiteinden apart door enkele knoopjes. Keer de uiteinden naar boven en duw ze opnieuw door de onderste pletkraal, en door een paar van je kraaltjes.


knip af en stop de eindjes weg in de kraal.


Knip beide uiteinden af en zorg dat ze wegzitten in een kraal.  (je wil niet dat de er stekelige uiteinden in je breiwerk gaan prikken, dus is het belangrijk dat deze mooi wegzitten).
Als dit naar je zin is, knijp de tweede pletkraal vast.  Et voilà !  Je stekenmarkeerder is klaar !


Ik vond leuke combinaties qua kleur, maar je kan zo gek gaan als je wilt !  De bedoeling is dat je de stekenmarkeerder goed ziet op je naalden - hij mag dus echt wel opvallen !


Ik gebruikte ook overschotjes van fimo kralen, oude parels van een halsketting, restjes myuki beads....  het mooie is dat mijn 'overschotjes' voorraad wat geslonken is. Recyclen of upcyclen is altijd fun.  En tenslotte, het zijn ook super cadeautjes voor je brei-vriendinnen.... !

Veel succes !


zondag 26 april 2015

bernadette....

Is it a girl ?  is it a miracle ?  No.  It's a hype in knitting land.  the bernadette.
Some time ago, a mother knitted a very simple vest for her daughter.  Daughter wore it to school, and other mums wanted the vest too.  So mum started knitting the vest for others, selling them in very exclusive Antwerp fashion stores.  400 euros for a very simple handknitted vest.


For me, that is a lot of money to spend on a vest.  My reaction was : I can knit that myself, and it won't cost that much money.

So I bought pale yellow mohair at 'Suzywol' and cast on stiches.  The original vest is just a bunch of rectangles : one for the back, 2 halves for both fronts and 2 small rectangles for the arms, all sewn together.

I added a little shaping for the upper part.  I found the original vest a bit ...    huge....  ?  and i'm not the thin and skinny 20-year old I used to be (lol) Now I know a raglan is very flattering for female shapes (read big) and I cast on....  I call it the Bernadette-Rose, because I added a significant change : the shape.

The pattern I designed is here.  It's for free.  You're welcome.  :-)
It's in dutch.  For English : scroll down. 


De Bernadette-Rose


Benodigdheden : dunne mohair wol of lace wol genre Kid silk mohair
of andere zachte lichte wol.  Je breit met 3 of 4 draden samen. Of dikkere mohair strengen van bij suzywol in Eernegem.
Naalden nr 8 ( en nr 10 om af te kanten)

Stekenverhouding  : met nld 8, in tricot steek :  9 steken = 10 cm

Tricotsteek is 1 naald rechts, 1 naald averechts.
Boordsteek 1/1 is : brei 1 steek rechts, 1 steek averechts.  In de tweede naald brei je rechts op rechts, averechts op averechts.  Dan krijg je een mooie boord. 
Minderen door overhalen = haal 1 steek af, brei de volgende steek rechts.  Haal de eerste steek over de tweede (zoals bij het afkanten) Deze geminderde steken hellen naar links, gebruik deze techniek aan het begin van je naald, dat maakt een mooie lijn in je raglan.
Minderen door 2 steken samen te breien : schuif de volgende 2 steken dicht bijeen op je linkernaald. steek de punt van de rechternaald (alsof je rechts gaat breien)  door beide steken in 1 keer. Brei die steek rechts en laat afglijden.  Deze mindering doet de steken naar rechts hellen.  Gebruik deze techniek op het einde van je naald, dan heb je ook hier een mooie lijn in je raglan. 

Rugpand
Zet 58 steken op met nld 10.
Brei 3 nld boordsteek 1/1 met nld 8
Brei verder in tricot.  (1 nld rechts, 1 nld averechts)
Na 46 cm kant je af voor de raglan : elke rechtse naald 1 mindering aan het begin en 1 mindering aan het einde van de naald.  (overhaling aan het begin, 2 samenbreien aan het einde, telkens op 1 kantsteek)
Na 25 cm raglan de resterende steken afkanten met nld 10.

Voorpand
Hetzelfde als de rug, maar ½.  Dus 29 steken opzetten. Brei de 2 delen samen op 1 ndl, of anders goed opletten dat je spiegelbeeld breit voor deel 2.

Mouwen
Zet 26 steken op met nld 10.  Brei 3 nld boordsteek 1/1 met nld 8.
Brei verder in tricot , meerder 6 steken in de eerste naald.
Op 30 cm (dat is driekwart lengte, brei wat langer voor lange mouwen) afkanten voor de raglan (zoals bij rugpand).  Na 16 cm de overgebleven steken allemaal in 1 keer afkanten met nld 10.

Zet de jas in elkaar : sluit zijnaden en schoudernaden.  Zet de mouw in.

Bernadette - Rose in English.

 This is a very easy and basic pattern, ideal for beginners.

You need : thin mohair (lace or fingering) held double or even 3 threads held together.(I knitted one in a single strand of lace mohair for a lighter summer version)
Needle 8mm ( & 10mm to cast off)

Gauge  : on 8mm : 9 stitches =  10 cm

Stiches and techniques used :

StSt : stockinette stitch.  you knit one row, you purl the next row.

Border = ribbing  1/1: knit 1 stitch, purl 1 stitch.  In the next row knit the knits, purl the purls.

ssk : slip slip knit. in this way you decrease 1 stitch and the decrease leans to the left.  Use this in the beginning of the raglan decrease rows, it will make a nice left leaning decrease line towards your shoulder.

k2tg : knit 2 stitches together, this way you decrease 1 stich and the decrease leans to the right.  use this on the end of your raglan decrease rows, it will make a nice right leaning decrease line towards your shoulder.

Back
Cast on  58 steken on needles 10mm.
Continue on the 8mm needles, knit 3 rows of border stitch.
Continue in StSt.
Start the raglan decreases at 46 cm : knit 2 stitches, ssk, knit until 4 stitches remain on your needle.  k2tg, knit 2 . purl the next row. Repeat until the decrease part measures 25 cm. Cast off the remaining stitches , using the 10 mm needle.

Front
Same as the back, only knit in 2 pieces. (one left front part, one right front part)
CO 29 st on the 10mm needle. follow instructions like for the back piece. For the raglan : at 46 cm you start the ssk decreases, no decreases at the end of your needle !  when you knit the second half, make sure it is a mirror image.  this means that at the raglan decreases, you now decrease at the end of the needle, with the k2tg method.  No decreases at the beginning of this piece.

Sleeves
CO 26 stitches on the 10mm needles.  Continue with the 8 mm needles in border for 3 needles. 
Continue in StSt, increase 6 stitches in the first row. (approx. every 4 stitches put the yarn over the needle to create an extra stitch)
When the piece lmeasures 30 cm, (that is for a 3/4 sleeve, knit a bit more if you want long sleeves) start raglan decreases, just like you did on the back.  (ssk in the beginning of the knit row, k2tg at the end)
When this raglan piece measures 16 cm, cast off using the 10 mm needles.

Sew the pieces together.  close the sides and the shoulders.  Insert the sleeves.

Do feel free to go and play with this pattern.  Add some cables, or a little lace.  Make it longer or smaller.  Have fun with it !


vrijdag 20 februari 2015

beginner's knitting : gloves for a toddler. Free pattern and photo tutorial.

A young mother asked me to explain how to knit gloves for her baby boy, aged 3.  She is a beginner at knitting, and prefers to knit with 2 needles, just like she learned a long time ago in school.

Keep it simple !....  working in the round,  no thanks.  Just a simple pattern, you can do that.  She said.  Clearly she had high hopes.

I thought about it.  And then came up with this :


Right.  Einstein would have trouble reading this I guess.  But it is REALLY simple.  Trust me.
Let's go.
(Voor de Nederlandstaligen : volg de vertaling in het groen)

I used DK wool and needles 3.5 mm.

Cast on 28 stitches, knit 2 stitches, purl 2 stitches until the end of the row.  Repeat on the next rows, until the piece measures about 3 cm.  Or about 10 rows. This is called ribbing, because the result is a nice stretchy ribbed border.

Zet 28 steken op, brei 2 steken rechts, 2 steken averechts over heel de rij.  herhaal deze rij 10x.  (tot ongeveer 3 cm) Deze boordsteek is extra rekbaar, en sluit goed aan rond de polsjes. 


 So far, so good. Now switch to knitting 'stockinette stitch'.  That is knit a row, purl the next row.  You must add 2 stitches , one at the beginning of the first knit row, and one at the end of that first knit row.  To add a stitch, you can knit in the front leg of the stitch, and again in its back leg.  too difficult ?  Just add a loop on your needle, it'll be fine too. You have 30 stitches now.  Knit 8 rows. end with a purl row.

Brei verder in tricot steek (1 rij alle steken rechts, 1 rij alle steken averechts).  Meerder in de eerste rij aan weerskanten 1 steek. Dat doe je door de steek rechts te breien in z'n voorste pootje, NIET laten afglijden, en nog eens rechts breien in z'n achterste pootje.  je hebt 30 steken. Brei 8 naalden, eindig met een averechtse naald. Brei 4 steken rechts, zet ze op een kleine speld, brei verder tot net voor de laatste 4 steken, en zet deze ook op een veiligheidsspeldje. Draai en brei een naald averechts.  Draai.  Meerder opnieuw 2 steken, aan elke kant 1.  Je hebt nu 24 steken.  Brei 20 naalden tricot.

 Now you will need 2 little safety pins.  Knit 4 stitches, put them on a safety pin, knit until you have 4 stitches left on the needle.  Put these 4 also on a safety pin. Turn. Purl the next row (you have 22 stitches left) When you start the next knit row, again add 2 stitches : one on each end. Continue knitting on these 24 stitches for 20 rows.


Now you will form the top of the hand.  Knit 2 stitches together. Put the tip of your right needle through both loops and knit.  It's easy. Do this for all your stitches.  You will have 12 left on the needle.  Purl.  Again, knit 2 stitches together.  You have 6 stitches on the needle.  Purl.  Again knit 2 stitches together.  You have  3 stitches left on the needle. Stop knitting.  Cut you thread at 30 cm.  And get a sewing needle with a big eye.

Nu vorm je de top : brei 2 steken rechts samen, over heel je naald : er blijven 12 steken over.  1 rij averechts.  Brei opnieuw alle steken 2 per 2 samen : 6 steken over.  1 rij averechts. Brei nog eens alle steken 2 per 2 samen.  Er blijven 3 steken over. Knip de draad af op 30 cm.  Haal er een naald bij met een groot oog. 

Now thread the needle and push it through the loops of your stitches.  Remove the knitting needle. Pull tight, and close the top with a few stitches.  Don't cut the thread yet.

Met de naald kun je de steken van je breinaald halen, trek de draad door de steken en zet goed vast. Knip de draad nog niet af.


Next step : the thumb.  Remove the little safety pins, and put the 8 stitches on a knitting needle.  Take care that they are in the right direction.

Volgende stap : verwijder de speldjes en zet de 8 steken op een breinaald. Zet ze in de juiste volgorde. 


In the first row you have to add 2 stitches, one on each side, so that you have a total of 10 stitches.  Knit stockinette for 8 rows. 

Zet in de eerste naald aan weerszijden een steek bij.  Brei 8 naalden tricotsteek over deze 10 steken.


Next you will form the top of the thumb.Very similar to the top of the hand !  Knit 2 stitches together all along this row, you have 5 left. turn and purl. turn and knit 2 stitches together, knit 1, knit 2 stitches together.  There are 3 stitches remaining.  Cut the thread and sew these stitches together like on the top of the hand. Use the thread to sew together the thumb, until you reach the point where you added the 2 stitches. Look at the photo's below.

vorm de top van de duim : brei de steken 2 per 2 samen, 5 over.  brei 1 rij averecht.  Brei 2 steken rechts samen, brei 1 steek rechts, brei 2 steken rechts samen.  Er zijn 3 steken over.  Knip de draad af, en doe net hetzelfde als met de top van de hand.  Gebruik je draad om de duim dicht te naaien, tot net waar de 2 steken bijgezet zijn. 


To close a seam, just pick up a thread on each side of the work and pull the needle through. Go up and down, as you can see in the pictures. You sort of zigzag along the seam.

Om breiwerk aaneen te naaien neem je telkens een draad op van de zijkant van je werk en haal je de naald erdoor.  Ga op en neer, zoals je in de foto's ziet. 


Stop at the base of the thumb.  Fold you work over in the other direction (horizontal) and knit that little seam together.

Wanneer je aan het begin van de duim komt, moet je het werk horizontaal plooien en in deze richting samen naaien. 


Close all the other seams to, in the same manner. 
Sluit de rest van de naden op dezelfde manier.


And there it is !  You've just made a glove for your kid.  As most kids have 2 hands, you will have to knit another one, just like the first.  perhaps it is clever to knit a third, just to be on the safe side.  kids tend to lose a glove.  Have fun with it !

Je moet natuurlijk nog een tweede want breien, en misschien ook een derde, want kinderen verliezen soms een wantje hé. Veel plezier !

Please let me know if things are unclear, or if you need more information, or if there is a mistake in my description. I have no test knitters....


woensdag 10 december 2014

crochet cats workshop

I was invited by a group of Femma-ladies for a workshop amigurumi's.
I suggested they'd make the crochet cat - and this is the gorgeous result !
It was a nice evening, thank you ladies !
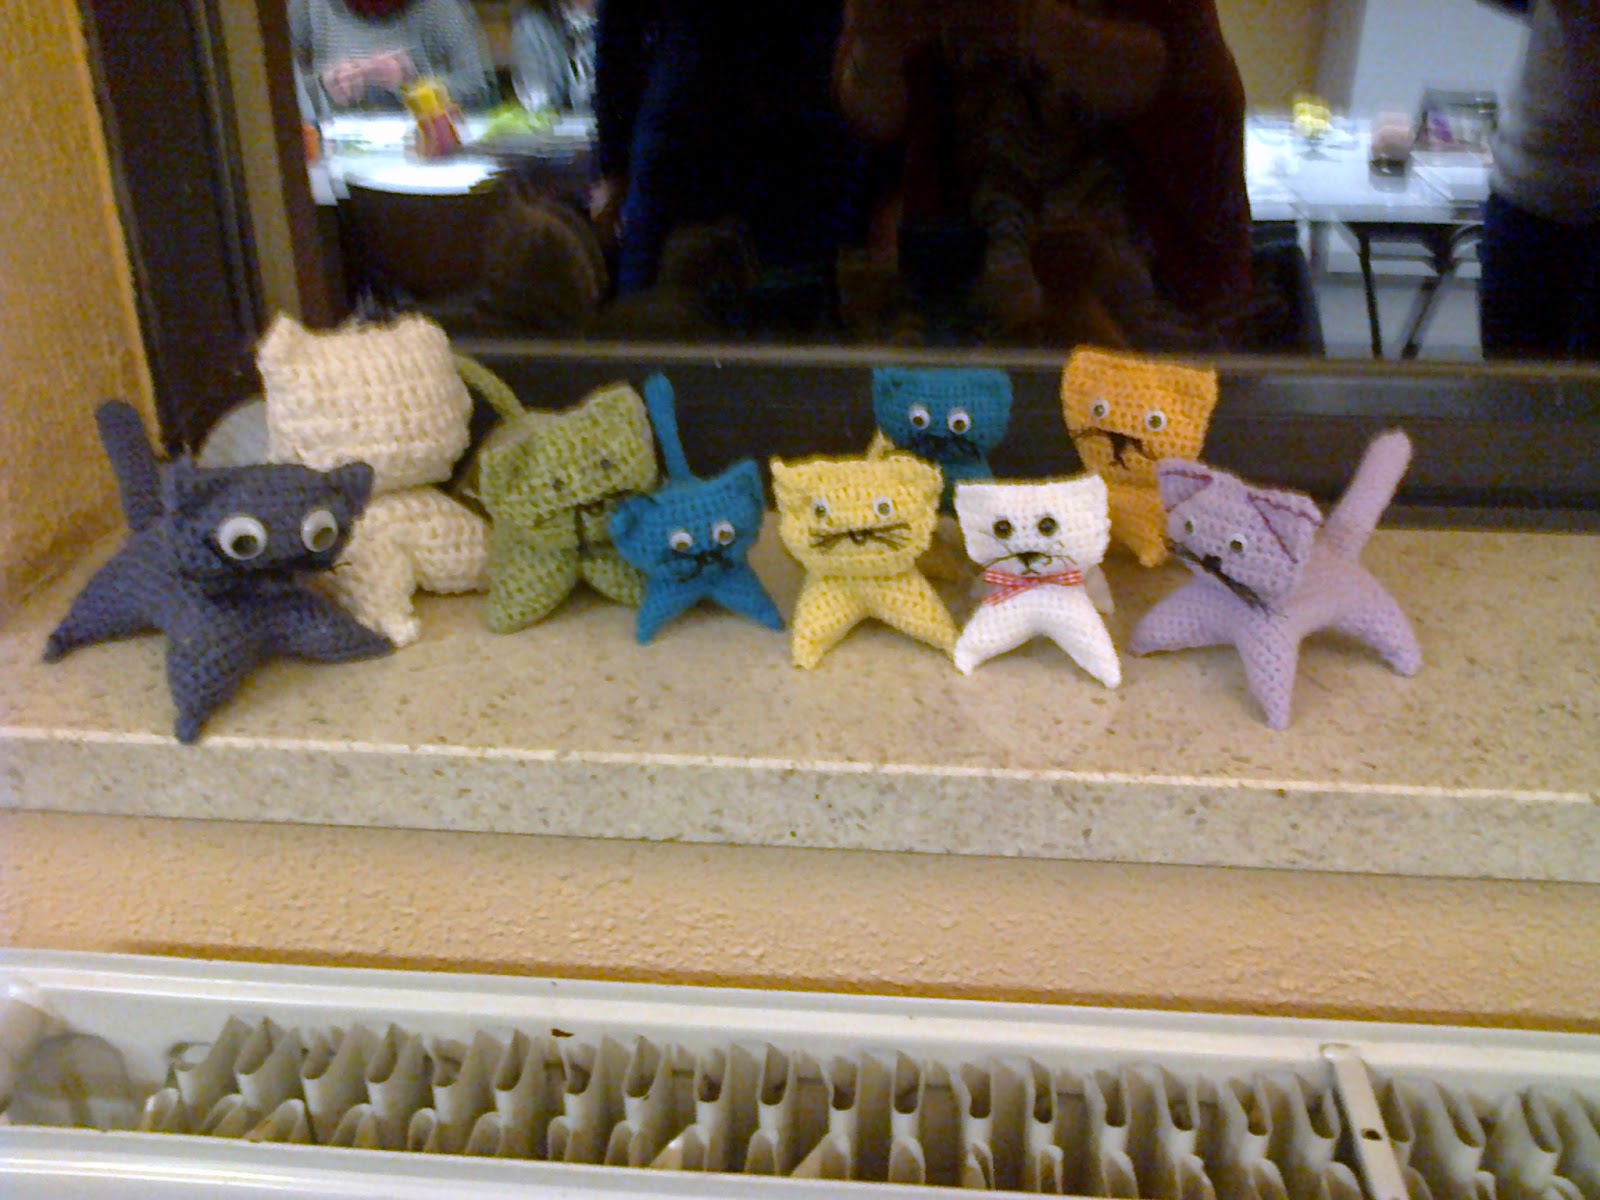

Free pattern and photo tutorial are available on my blog.

woensdag 5 november 2014

een eenvoudige kantsjaal breien - a very easy lace scarf

I found this great free pattern on Pinterest, for a lace scarf.  It's actually called a 'true lace' - that means you knit the pattern on both sides, in stead of knitting a pattern on the right side and purling the stiches on the reverse side.
But don't let that scare you off - this is such an easy pattern you will memorize it quickly and knit it whilst watching you favourite tv show.
Here's how it goes :
choose your yarn carefully.  I have seen this pattern knit in bulky yarn, very nice for a guy ! In sports it's rather dull, but in mohair it is the most lovely scarf ever ! Choose your needles according to the effect you want to get; like needles 6 mm with a fine kid mohair gives a fluffy result : a very soft and light scarf.
I choose this kid mohair with little sequins in, in a light taupe.  this colour goes well with everything I wear.

just a little bling bling

It's a great scarf !

Cast on a multiple of 4   (like 16, or 24 or even 80 stitches)  I cast on 44.  Knit 2 rows.
Always start with 4 knit stiches.  then follow the pattern :  (YO, K2tog, K2) repeat until there are 4 stiches left on the needle.  knit 4 stiches.
Turn.  Do this every needle.  End with 2 knit rows.  Cast off very loosely. (check Youtube for loose cast of) I like this method : knit 2 stiches together, put that loop back on the left needle.  knit 2 stiches together, put that loop back on the left needle.  and so on until all stiches are cast of.

Wouldn't that be a nice xmas present for a loved one ?

happy knitting !

In het Nederlands : 
Zet een veelvoud van 4 op (ik zette 44 steken op)
Brei 2 naalden rechts
Brei patroon als volgt :
4 steken rechts * 1 omslag, 2 st rechts samenbreien, 2 steken rechts*  herhaal wat tussen de * staat tot er nog 4 steken op je naald staan.  Brei de laatste 4 steken rechts.  Herhaal deze naald tot je sjaal lang genoeg is. (brei je bolletje maar op :-)  
Brei op het eind nog 2 naalden rechts en kant erg los af. 


vrijdag 10 mei 2013

a crochet collar

a leftover of royal blue cotton turned into a trendy collar !


I really like this blue, and it turns a simple green t-shirt into a fashion item.

And it's really easy-peasy to make.  It takes only 5 rows.  The patterns is here : (in het nederlands tussen de haakjes lezen)  A pattern in symbols is at the bottom of this post. Scroll down.

cast on with cotton (I used a 3mm hook) as many chain stiches as the collar of your t-shirt is wide.
It should be a multiple of 4.   (zet zoveel steken op als de nek van je tshirt wijd is, zorg dat je een veelvoud van 4 hebt)

Now add 6 extra chains stiches, form a little loop (for the button) and close with a slipstich in the first chain of these 6.  (haak 6 extra steken voor de knooplus, maak de lus vast met een halve vaste in de eerste van de 6 extra steken)

the first row : make a half double crochet in each chain.   (In nederlands : halve stokjes, op het einde draai je het werk, 2 kettingsteken als eerste stokje van de 2e rij ) 

Turn. Make 2 chain stiches as your first double crochet.

the second row : the 2 chains count as the first double crochet.

*a double crochet, skip a stich, make a double crochet, 2 chain stiches, a double crochet in the next stich, skip a stich*  Repeat until the end of the tour, turn. 

Tweede rij : * stokje, sla een steek over, maak een stokje , 2 kettingsteken, een stokje in de volgende steek, sla een steek over *  herhaal van * tot *  tot het einde.

the third row :
start with * a double crochet. Make 2 double crochets, 2 chain stiches, 2 double crochets in the space between the double crochets of the previous row.*  Repeat  from * till * until the end of the row.

Derde rij : begin met * een stokje.  Maak 2 stokjes, 2 kettingsteken, 2 stokjes in de opening tussen de stokjes van de vorige rij.*  herhaal van * tot *

Fourth row : same as third row, but make 3 double crochets in stead of 2.
Vierde rij : zelfde als vorige toer, maar nu met 3 stokjes ipv 2.


Fifth row : in this last row you make the scalloped edge.  Start with a single crochet  above the double crochet of the previous row.  *Now make 8 double crochets in the space between the 3 double crochets. make a single crochet above the double crochet of the previous row.*    continu until the end.

vijfde rij : nu maak je de geschulpte rand.  Maak een vaste boven elk stokje, en maak 8 stokjes in de ruimte tussen de 3 stokjes.

I sewed the collar to my t-shirt, and added a little button.

Zet een knoopje aan, en maak het kraagje vast aan je tshirt.


This is the pattern : 


dinsdag 1 januari 2013

muts met klep - beanie with flap - free pattern


Some time ago I posted the pictures of this hat I knitted.  I regularly get mails from people who'd like to knit one too.  So here is the pattern of how I knitted it.  It's actually very easy, I'd say beginners.  Advanced knitters can use it as a base to construct your own version of it.
I like to wear this hat when I have to cycle to work, and it rains.  The flap keeps the rain out of my eyes, and the border is warm around my ears.
Good luck !

Scroll down for the Dutch version.


Knitted with 100 gr of wool, needle nr 4.
CO 66 stiches
purl 18, k1, p7, k4, p4, k4, p4, k4, p4, k4, p4, k4, p4
row 2 : knit the stiches as they are.  (purl the purls, knit the knits)

continue until you have 53 cm.  BO

(53 cm is the avarage circumference of an adult female head.  But do check for yourself.  The knitting streches a bit too. Knit the piece a bit longer if you have a bigger head, or if you make it for a man)
Now sew both short ends together.
Fold the 18 purled stiches in half and close (sew)  at the inside of the beanie.
Insert the plastic flap before you close it completly.   This plastic flap is approx. 21 cm long and  can be made of any sort of flexible plastic.  I used an old plastic ordner from schooldays. 
close the top part, add a pompom if you want to. 

you can download the pattern of the flap

Dit is het gratis patroon voor de muts met een klep.


Gebreid met 1 bol wol van de wibra ( 100 gr)
met nld nr 4
66 steken opzetten, en als volgt breien :

18 averechts, 1 rechts, 7 averechts, 4 rechts, 4 averechts, 4 rechts, 4 averechts, 4 rechts, 4 averechts, 4 rechts, 4 averechts, 4 rechts, 4 averechts. 
Terugkerende naald : brei de steken zoals ze zich voordoen.

Brei zo tot je ongeveer 53 cm hoogte hebt.  Afkanten.   (gemiddelde omtrek van een dameshoofd, maar meet eens na bij jezelf)

Naai nu de beide korte einden aaneen.  De 18 averechtse steken plooi je dubbel, naai vast aan de binnenkant, stop het klepje erin. (= Knip uit hard plastic een klepje van +/- 21 cm lang)
De bovenste opening haal je dicht met een draad.  Eventueel kun je er een pompon opzetten...

zondag 14 oktober 2012

knitting a necklace

I have found the perfect knitted Christmas present : a stunning necklace.

It is easy peasy to make, in about 2 hours it is completely finished.
the how-to tutorial you can find here : olgajazzzy.blogspot.be


This is what I made : 

finished with a vintage button

lurex thread gives it a sparkle

finished in 2 hours !

Related Posts Plugin for WordPress, Blogger...